RAM and cryptocurrency mining.
Novice miners who are putting together their first farms for mining cryptocurrency often do not know how much RAM they need for a rig. In this article I will touch on the question of RAM and I think that I will be able to find the most suitable answers that will satisfy the reader.
So, what do we know about RAM (RAM) - This is temporary memory in computers where data is stored.
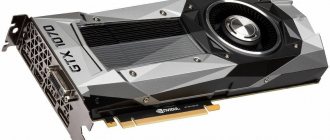
The higher the frequency of the RAM, the faster the central processor accesses it in order to load from the hard drive or read data to work with it in various applications. The amount of RAM is responsible for the amount of data that the system can load into it. For modern gaming computers, 8–16 GB of RAM is sufficient. A running game that requires computer resources takes up the video memory of the graphics professor to solve floating point equations and process textures; these textures are loaded by the central processor into RAM, and the video card already draws data from it into its VRAM. RAM for gaming systems is selected in a 2:1 ratio, if you have a 4 GB video card, then 8 GB of RAM is enough, or if, say, 1070 for 8 GB, then it is better to add an extra RAM module to the system so that there are 16 GB.
In mining, RAM should be selected according to the number of video cards, without relying on what is written above, because the task of RAM in a farm is to ensure stability and space (bandwidth) for the full functioning of many video cards in the system. Farms are usually assembled on four or six video cards; in both cases, a RAM capacity of 8 gigabytes will be enough to ensure that the miner program (Claymore, for example, which requires a minimum of 4 GB in Windows 64 bit) does not crash and the operating system does not glitch . I noticed that when running continuously 24/7, farms with 8 GB of RAM are cut down and freeze less often than those with 4 GB.
Launching solo mining in stages
Official website sourceforge.net.
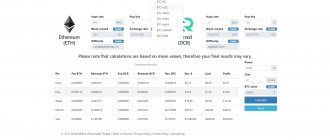
Plotting for all coins is carried out the same way; you can understand the principle using the example of Burst, the most profitable coin among those that are mined on hard.
First you need to install a wallet for Burst.
The official Windows wallet can be registered here – sourceforge.net/projects/burstwindowswallet/
Installation details are shown in the video.
After registration, you need to set a passphrase (this is the key to your account) and generate your public key.
For solo mining you need to install the latest version of the Java framework. It can be downloaded here java.com/ru/download/.
Next steps after downloading:
- Unpack the archive into the root folder of your hard drive for mining.
- For a 64-bit version of Windows, when storing programs on drive C, it is advisable to replace the word java in the contents of the batch files with C:\Windows\SysWOW64\java. This is not a required item.
- Run the run.bat file.
- Log in to your Burst Wallet account.
- Save your secret phrase to the passphrases.txt file, run the run_dump_address.bat file. It will generate an account number.
- Open address.txt and paste this number there.
Then open the document run_generate.bat, insert the following values in it:
C:\Windows\SysWOW64\java -Xmx*[amount of RAM for JAVA]*m -cp pocminer.jar;lib/*;lib/akka/*;lib/jetty/* pocminer.POCMiner generate [account number from the address file .txt] [first plot] [last plot] [plot size] [number of processor cores for generating plots].
It is not advisable to edit the plot size and the amount of RAM for the Java virtual machine.
An example of an edited batch file.
In the example, the processor is 2-core, 200 GB.
Next, do not close the wallet and do the following:
Example.
- Run run_generate.bat. The disk began to break into rafts.
- Run run_mine.bat.
Run.
- If notifications about errors in reading a file appear, do not worry.
- The run_generate.bat window must be closed after all plots have been generated.
You can learn how to create plots more quickly, and what to do if the electricity suddenly turns off during generation, from this interesting video.
Two more good videos with step-by-step explanations and solutions to possible problems will help you avoid mistakes.
What RAM should I use to build farms?
I assembled my first farms on the basis of a 775 socket with DDR2 RAM, because it’s cheap, and a rig with three gigs on board (I don’t know how it worked and why, magic, probably) and four AMD R9 390 video cards worked for a year and a half, mining Ether.
Later, I realized that you couldn’t get far with an outdated kit, and started assembling on partially current hardware with 4-8 GB DDR3. At the moment, casting my vote in the direction of modern and expensive hardware, in view of the highest fault tolerance, I pin my hopes on the maximum return from the farms I have collected.
For several years now, the current and modern RAM has been the DDR 4 generation. This is more energy efficient RAM than previous DDR3 and DDR2, I would not say that this factor is useful for the profit of the farm, but RAM operating at a lower voltage lasts longer. The frequency spectrum is amazing: from 2100 MHz to 3200 MHz (without overclocking), so the farm will “think” quickly, the main thing is that the processor maintains the maximum frequency. Since the farms are assembled on Celerons (Skylake and Kabylake), there is no point in taking a DDR4 8 gb RAM module above 2100-2400 MHz.
Selecting a hard drive for mining, assembling a farm
Carrier.
Before you start mining cryptocurrency, you need to figure out what hardware is suitable for this. There are 2 types of hards.
| View | Short description |
| HDD | There are magnetic disks inside the case; when they rotate, data is written to or read from them. That is, the HDD reproduces information on the same principle as a gramophone. |
| SDD | It is a set of flash memory chips mounted on a board. |
Miners are primarily interested in 3 hardware parameters.
| Parameter | Comparison of HDD and SSD |
| Price | SDD for mining is about 4-5 times more expensive. In order to calculate the price per 1 GB, you need to divide the cost of the entire disk by the amount of its memory. For example, a terabyte HDD costs approximately 3,000 rubles, which means the price of one gigabyte is about 3 rubles. (A terabyte is not 1000, but 1024 GB). A 1 TB SSD will cost about 12,000 rubles, in terms of conversion this will give more than 15 rubles. per gigabyte. |
| Memory | HDDs have an essentially unlimited maximum capacity; for example, Amazon uses disks with a capacity of 100 Petabytes (more than 1 million GB) and transports them on giant trucks. Such equipment is certainly not available to the average miner; you can buy 15-40 GB HDDs in stores. SDD has a maximum capacity of 16 GB (manufactured by Samsung), but such a development costs from $1000. Disks with capacities ranging from 1 to 4 TB are widely available. |
| Speed and fragmentation | SDD is 5-10 times faster and much less susceptible to fragmentation. |
SDD is also better in other parameters:
- Doesn't make noise.
- With proper handling, the service life ranges from 5 to 15 years, while the HDD can become obsolete in 3-5 years.
Conclusion: if your budget allows, then it is better to take an SSD for mining, but you need to keep in mind that it will take much longer to pay off. Prices for SDDs are decreasing every year, which means that buying top models will not pay off. Therefore, most miners choose HDD, and later in the article we will talk about it. Although there is a problem when minergate does not see the video card.
Mining on HDD will be the most profitable when purchasing such models.
| Name | Memory capacity | approximate price | Approximate number of coins per day |
| Toshiba DT01ACA | 3 TB | 2000-2300 rub. | From 15 BURST |
| Toshiba P300 HDWD130UZSVA | 3 TB | 4500-4700 rub. | From 20 BURST |
| Toshiba HDWD130EZSTA | 3 TB | 5000-5800 rub. | From 22.5 BURST |
| Seagate BarraCuda ST4000DM005 | 4 TB | 6500-6800 rub. | From 30 BURST |
| Western Digital WD Red (WD60EFRX) | 6 GB | 13,400 – 13,800 rub. | From 45 BURST |
| Seagate Archive HDD ST8000AS0002 | 8 TB | 12,500 – 12,800 rub. | From 60 BURST |
| HGST HUH721010ALE604 | 10 TB | 19 500 – 19 800 | From 75 BURST |
Since drives can fail, it is more profitable to buy several smaller drives than one large one. The main requirements for a hard drive for successful coin mining are memory and speed.
Those who plan to invest in equipment will need to assemble a mining rig on hard drives. The video explains and shows how to do this.
Swap file for the farm.
What is a page file and what is it for? This is a place on a storage device (hard drive or SSD) where data for RAM is partially written. I won’t go into a long description of how exactly this technology works; I’ll go straight to the most important thing.
Some applications in the WINDOWS operating system require that the paging file option be enabled, so developers insure their software against a lack of RAM on user systems. After installing the OS on the computer, the paging file function is enabled by default and has a static size of 1500 megabytes and above (usually up to 4000 megabytes with a RAM size of 4 GB, and with one video card in the system). It was experimentally discovered that for stable operation of the mining farm, it is necessary to set a static size of the paging file equal to 16,000 megabytes. This volume helps to “unload” the RAM when loading a DAG file into six video cards when mining Ethereum.
Setting up a laptop for cryptocurrency mining
From a software point of view, laptops work similarly to desktop computers, so standard operations are performed to set up mining:
- Operating system optimization. Mining is carried out under Windows 10 version 64-bit. It is recommended to disable automatic sleep mode (menu item “Power settings”), increase virtual memory (menu item “System performance”) in the control panel.
- Installation of the mining program. The specific version of the miner is selected depending on the selected algorithm, GPU and CPU models, as well as the power of the laptop. For example, owners of productive models can use dual mining to simultaneously mine several types of coins.
- Connecting to a pool and overclocking equipment. The pool member uploads the executable file, adds the wallet address, login and password to the .bat file. Overclocking of equipment is carried out taking into account the lower operating temperatures of the GPU and CPU.
Before you start, you should create a wallet to store coins, make sure you have a stable network connection, and the presence of an uninterruptible power . When overclocking a video card, monitoring the state of the GPU will come in handy, helping to avoid overheating of the board.
RAM where to buy 8 GB and what is the price for ddr4?
The cheapest option for purchasing RAM, especially for farms, is AliExpress, where there are discounts on batches of RAM modules. Yes, you will have to wait for delivery for some time, but you can reduce the payback period for your farms.
And the Lety Shops cash back service will help you return some of the money from purchases
Register using the link, now there seems to be a promotion: you can get premium + 30% of cash back for 3 days.
- < Back
- Forward >
Setting up the operating system
When configuring the system for mining:
- It is advisable to use an SSD with a capacity of 120+ GB.
- Use a single partition on the system disk.
- Install one video card connected via a USB riser in PCIE.
- Disable the Internet, do not configure the connection.
buy bitcoin
Setting up Windows:
- Set the power mode to High Performance. Control panel - power supply. In the plan settings and additional settings, select “Never” in all drop-down lists (or check boxes).
- Set the video memory swap file to the total amount of video memory in the farm (minimum 20,000 MB). Computer - Advanced settings - Advanced - Performance - Advanced - Virtual memory - Page file.
- Make sure your drivers are up to date and update if necessary.
- Add the mining program to startup so that the application restarts on its own.
- Exclude automatic system updates - install and run the Win Updates Disable or Show or hide updates utilities.
- After setting Windows settings, reboot.
BIOS setup:
- Set CPU FanControl to Auto. This will prevent the fans from having a constant maximum speed.
- PCIeSpeed change to Gen2.
- Enable Restore on Power Loss Otherwise, if there is a power outage, the rig will not be restored automatically.
Optional (recommended) settings:
- Disable HD AudioController (not needed);
- PCIEX16_1 LinkSpeed and DMI Max LinkSpeed set Gen2;
- 2_1 Configuration change PCIE (for 8+ GPU PCI Express);
- Serial Port 1 turn off;
- Above 4G Encoding is enabled.
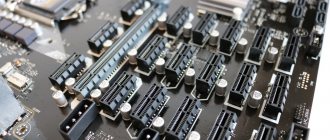
Motherboards (examples) for 6+ GPU farms:
- MSI Z 270-A Pro;
- Asus Prime Z 270-P;
- AS Rock H81 Pro BTC 2.0.
It is better to choose a processor with 4 cores or more, for example, Xeon 3430 (4 cores, 2.4 GHz) is a popular model for mining.