Content
- Working with Windows 10
- How to work with Hive OS
- Installing and configuring Hive OS
- How to set up wallets and connect Hive OS miners
- Bottom line
As a child, I really loved looking out the window.
Especially out the window of a moving train. I liked it so much that I thought when I grew up I would definitely come up with a job for myself so that I could look out the window. I grew up, but I didn’t give up my dream. When computers came into my life, they were still dominated by msdos, and I remember what a revelation the semi-axis was for me - OS/2 from IBM. But then Windows came and killed everything, and the half-axis from IBM and the desire to look through the “windows”. As a result, I found salvation for myself in MacOS and forgot about “windows” for many years.
Setting up wallets
Now that you are familiar with Farms, you can start creating your wallets. Multiple wallets can be created for any coin you like. In fact, if you plan to mine multiple coins, we suggest creating different wallets that you can later combine with different miners and different pools. When you select a coin in the mine on the flight sheet, you will see that depending on the coin you select, the selection of wallets will be limited to that specific coin.
To add a new wallet, open the “Wallets” tab and click the “Add Wallet” button. A pop-up window will appear with the following fields:
Creating a new wallet
- Coin - Select the coin for this wallet from the drop-down list.
- Address - Enter your wallet address.
- Name - Use a name that best describes the purpose of the wallet. For example, Ethereum on Claymore, ZEC on CCminer, etc.
Read also: Setting up a wallet in Hive OS
Click “Create” to save the new wallet.
Once you've finished creating your wallets, go to the Flight Sheets tab.
Working with Windows 10
But! Then mining appeared, and I met Windows again. Like many novice miners, when assembling my first rig, I didn’t think much about choosing an operating system. Of course, it was Windows 10. I heard that there are solutions for mining on Linux, but I didn’t even seriously consider them. There were enough questions with hardware, but there was definitely no time for software...
The farm on Win 10 was successfully assembled, configured and tested, and since it was supposed to be installed remotely, Teamviewer was installed, which solved the problem of remote control of the rig.
Following the first rig, the second one was assembled, and Win 10 paired with Teamviewer also settled on it. After testing, the second rig also left for its work shift in a remote location. By this time, I was already beginning to understand what I didn’t like about Win 10.
What I didn't like:
- I was surprised by Win 10's approach to saving system settings. For example, I turned off Windows Defender and the update service, but on one of the rigs the system still constantly downloaded updates, freezing a couple of times, and Defender with enviable regularity tried to “cut off” the Internet to Claymore. To be honest, I'm just too lazy to deal with this. When I saw the “experienced” recommendations for setting up Win 10 in the rig, I immediately became sad.
- A couple of times Teamviewer could not connect to a remote machine, which simply refused authorization. At the same time, the rig itself, judging by the pool readings, was “digging” regularly. The lack of remote control option really bothered me!
- To quickly change the miner or algorithm, I had to go to each rig separately and restart the miner there with the necessary parameters. True, this problem is successfully solved by the method described on the Two Bitcoins website a couple of days ago.
Here everyone will add to this list and decide how important these points are for him.
But, in fairness, I must say what I liked:
- The speed of the system is definitely pleasing, although the big merit here is not so much Win 10 itself, but the SSD drive.
- Managing card overclocking using Afterburner. This is really convenient, especially if you save several presets for different algorithms in advance.
- The ability to download the official version from the Microsoft website, which copes with its “farming” affairs perfectly without registration.”
Main elements of the system interface: map, pop-up menu, menu for working with base stations
Map is the workspace of the system user. The map shows the geographic location of base stations and range.
Base stations in the HIVE system are divided as follows:
- Stable stations. By default, stations are considered stable if the percentage of data available in the RINEX system for 7 days is more than 90. If less than 90% - unstable. The stability limit is adjusted in the filters.
- Experimental stations. Stations that have just connected to the HIVE system become experimental. After connecting, new stations accumulate satellite data, and system administrators obtain metadata from station owners: information about equipment, coordinates. After 2–3 weeks of stable operation, the experimental station enters the “stable” category. The base station remains in the "Experimental" category for several reasons: regular malfunctions, user complaints, lack of metadata.
The map also shows the operating radius of each base station. The default radius is 100 km. To change the apparent operating radius of stations, use the “Radius of coverage areas” slider. Change the apparent radius of work with the station from 5 to 200 km, check whether the station covers your work area.
The Reconnaissance tool makes it easy to select the closest base station to the work area. Read more about this tool and other features of the HIVE system interface in the special newsletter: “Introduction to the HIVE interface.” To receive the newsletter, register in the HIVE system:
In the upper right corner of each page of the site there are 2 black round buttons. The cloud button opens a feedback form. Ask any questions. The HIVE system administration checks email around the clock.
The “hamburger button” brings up the side menu.
Using this menu you can perform the following actions:
- Map. Go to the HIVE system map.
- Registration. Register in the HIVE system.
- Login. If you are a registered user of the HIVE system, log in using your username (email) and password.
- Personal account (available after logging in). In the personal account, the user manages the HIVE balance status, views the history of operations (purchase of RINEX data, sessions in RTK).
- Logout—logs out of the system.
- Home page. Go to the first page of the HIVE system.
- Features and prices. Go to the page with tariff plans for different categories of users.
- Owners of base stations. Questionnaire for owners of base stations who decided to connect to the HIVE system.
- Offer. The text of the standard agreement under which the user works with the HIVE system.
- Blog. Link to this blog.
How to work with Hive OS
Starting to assemble the third rig, I wondered about possible alternatives to Win 10 and, following a tip from Alexey Rubin from the chat, whose article about the Ledger hardware wallet is on the site, I turned my attention to the Miners Hive OS project.
The system is a Linux assembly based on the Ubuntu distribution, which immediately after deployment offers its users a number of tasty goodies:
- Possibility of remote monitoring and management of the rig via the website hifeos.farm.
- Built-in hashrate watchdog, which overloads the miner or the entire rig when the hashrate drops. By the way, hardware watchdogs are also supported, including the popular solution from open-dev.ru.
- Support for a large number of miners for AMD, NVIDIA video cards and even for CPU.
- Ability to launch and work from any flash drive with a capacity of at least 8 GB.
Installing and configuring Hive OS
Having gone to the hiveos.farm project website, read reviews on the forums, and also watched the video on the project page, I decided that my third rig would definitely be on Linux.
No sooner said than done. The installation process itself is very simple. Go to the website https://download.hiveos.farm/ and download everything you need:
The first two lines are a Windows utility for writing an image to a flash drive or hard drive. Next are the Hive assemblies themselves. Please note that the versions are presented in ascending order, i.e. newer versions are located below!
Download HDD RawCopy and the image itself hive-0.5-03-20171029 (If you do not have a very stable Internet channel, you can download the image using a torrent).
Next, take any flash drive with a capacity of at least 8 GB, and use HDD RawCopy to upload the image to it. Let's get to the fun part! No, not about installing Linux, but about launching it on our rig!
However, my first pancake came out lumpy. I uploaded the image to a flash drive on a computer running MacOS, and apparently something went wrong... When I tried to install Hive, I got a black screen with a funny cursor. And I wasn’t even surprised; I was preparing myself for something like this. Well, Linux can't be simple. But for the purity of the experiment, I re-uploaded the image from Windows and got a completely different result. More on this below.
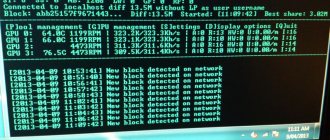
No installation is required as such. I just started the rig from a flash drive, and Hive OS configured itself in automatic mode. Moreover, unlike Windows, I immediately launched and configured the rig with 7 cards installed! No sequential additions to the rig one card at a time, as in Windows, were required.
The same rig, when trying to install Win 10 with 7 cards at once, drew a donut on my monitor and disappeared into itself. I had to tediously plug in one video card at a time, reboot, wait for drivers to be installed, etc. In general, it’s boring, not so in Hive OS! Assembled the hardware and downloaded the software.
In order to observe the entire configuration process, you can connect a monitor to the rig. But there is one subtlety: you need to connect it to a video card that is installed in the first PCIe-16x slot - this is important! Starting from version v 0.5, the monitor can be connected not only to a video card, but also to the built-in video adapter.
By the way, during installation it is quite possible to do without a monitor. When installing Hive OS on the second rig, I successfully used remote access to the rig via ssh. You can also use VNC Viewer, but for me ssh is more convenient.
In general, access via ssh is the main way to directly administer a rig. If the rig is on the same network as the control computer, then we can log into it using a terminal or ssh client:
ssh where xxxx is the ip address of our rig. The default password is 1.
If it is installed remotely, then you can configure remote access via OpenVPN or hamachi.
In the meantime, while the system was being set up, I didn’t go drink tea and didn’t sit stupidly staring at the lines running across the screen, I spent it usefully: I registered on the website hiveos.farm
After registration, we get to the page where basically all interaction with our rigs will take place.
In the top menu we see our current account, its balance, as well as menu items:
Reload / Monitor / Stats / Rigs / Wallets
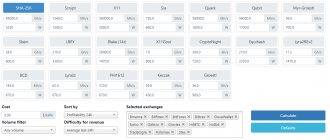
Now I need the Wallets , where I need to create configs for miners. This can get confusing because of the concepts, so it's worth explaining a little. Wallets, in the understanding of Hive, is not a wallet for cryptocurrency, but a kind of config file with settings for miners, which all rigs can use in the future!
We can create as many wallets as we want, in each of which we can specify settings for different pools or coins.
So, I go to the Wallets and create my first wallet.
For ease of initial setup, the system already has several templates that you just need to change to suit your needs:
Choose a ready-made template or create a new wallet from scratch:
In the upper left corner, in the Name , you need to set a convenient name for the wallet. It is advisable to choose a name for the wallet that speaks, so that later it will be convenient to quickly select the desired wallet. No, you can, of course, just use beautiful motivating names: Louis Vuitton, Prada, Dolce Gabbana, etc. But then we will need to remember that we have the Prada wallet configured for mining ETH on the 2Miners pool, and in the Dolce Gabbana wallet we have configs for mining shitcoins.
Next, in the upper right corner in the field: Email for pool %EMAIL% we can indicate your email address. Some pools may use it for authorization, but I haven't had any use for it yet.
WHATTONEWS
As a child, I really loved looking out the window. Especially out the window of a moving train. I liked it so much that I thought when I grew up I would definitely come up with a job for myself so that I could look out the window.
Please share this material