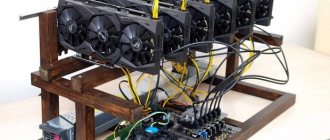
Even beginners in mining understand that several video cards simply cannot fit into one case, so special designs are used to create a farm. It is physically impossible to place 4-5 video cards on the motherboard, so special extension cords are used to organize a rig (farm). A mining riser is an integral part of the farm, without which no rig will be able to function correctly.
There are many nuances, features and types of risers that you need to know. Without this, it is unlikely that it will be possible to properly organize a mining farm, think through cooling and power supply, and ensure that video cards are protected from damage. In this article we will look at everything related to risers, their types, the advantages of some models and proper connection.
What is a riser for?
The very concept of riser, which comes from the English word rise (growth, increase, etc.), is used to refer to special adapters. They are a PCI-E bus extender, which is necessary to connect a large number of video cards to the motherboard. Obviously, you won't be able to connect video cards directly. Firstly, due to the thickness of the devices, secondly, due to high heat generation, and thirdly, due to the risk of short circuit. The riser design includes a board and connector for a video card, as well as an extended cable or USB 3.0 cable.
It is immediately necessary to dispel two main myths about risers:
- Depending on the chosen model, the mining speed may increase or decrease.
- It’s better to make risers yourself and save money.
Let's start with the definition of speed. A riser is not a device that can affect the hashrate in mining. It provides an extended connection between the video card and the motherboard. That is, this is solely a matter of technical organization. If someone promises you “special” devices that will increase mining speed, know that this is a charlatan or an incompetent person.
The second myth about saving, unfortunately, often “afflicts” budget mining. Some enthusiasts try to assemble risers themselves, others take the cheapest models. All this most often leads to two outcomes: the video card burns out or a short circuit occurs on the board. In both cases, the miner will suffer serious financial losses. It is also worth considering that problems mainly arise with the board. In the case of inexpensive models, we are usually talking about poor soldering.
How to choose a riser for video cards?
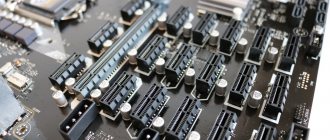
Data transfer between the video card and the motherboard is carried out via the PCI-Express bus of 1x or 16x format. The difference in format is only in size, number of contacts and bandwidth.
In simple words, a riser is an extension for the PCI-Express connector and allows you to move video cards outside the case. In most cases, the riser consists of the following elements:
- Tiny card with PCI-e x1 connector (installed in the motherboard);
- Large board with PCI-e x16 connector (directly for the video card);
- USB cable for connecting boards;
As you already understood, the riser is connected to the motherboard in any of the PCI-e slots presented on it, ranging from x1 to x16.
If we talk about colors, then the quality of black and blue risers is many times better than green ones, which we categorically do not recommend buying. There is a myth in the mining community that green risers are soldered poorly (especially voltage controllers). In this regard, it is necessary to double-check all connections and the quality of soldering itself.
You need to make sure that the riser produces 3.3 W. If the marking is 5 W, then it will be necessary to convert this voltage to 3.3 W, since the video cards will not work correctly.
As for the tiny card for connecting to the motherboard, it often does not cause problems. However, you still need to check the soldering of the USB adapter (sometimes there are flimsy plugs due to solder savings).
A USB 3.0 cable for connecting with PCI-E risers has no problems at all, because they are used exclusively for data transfer.
It is noteworthy that the length of the USB cable can be either 30 cm or 60 cm. Which one should you choose? It all depends on how far you want to place the video cards from the motherboard.
Types of models
Now let's move on to the main thing - what risers can be and which types are considered more reliable for mining. Initially, all models are divided by connection type into two categories:
- with a flat train;
- with a USB 3.0 cable.
Models with a train usually cost less and are considered inferior, regardless of whether they are made manually or using special equipment. The main reason for their unpopularity is instability. They fail more often and can damage mining equipment. In addition, risers with a cable length of more than 40 cm are considered useless due to unstable operation. It is also worth considering that combining more than three stub risers is highly undesirable; this can pose a direct threat to your mining farm.
Risers with USB 3.0 are much more stable, although their price is usually higher than that of daisy chain ones. Moreover, this connection allows you to remove the video card from the motherboard at a distance of up to a meter. There is a stabilizer on the boards of such devices, although it has no real benefit and is more likely a marketing rather than a real advantage.
It is especially worth highlighting the presence of power connectors on the risers. Usually it is 4 pin (Molex) or 15 pin (SATA). According to reviews, tests and the opinion of professional miners, the choice should only be made towards Molex connectors (even if you need adapters), since in this case SATA is not designed for such loads.
Cables and adapters
Adapters can be divided into 3 categories, from CPU, PCI-e, Molex. In certain cases, you can use different adapters to connect risers or peripherals.
For example, many high-power power supplies are equipped with two CPU connectors; this can be used, since otherwise one of the connectors will be idle.
CPU to PCI-e adapters
CPU to 1x6pin PCI-e adapter
CPU to 6+8pin PCI-e adapter
PCI-e to PCI-e adapters
PCI-e to 6+6pin PCI-e adapter
PCI-e to 6+8pin PCI-e adapter
Molex to Molex adapters
Molex to 2xMolex adapter
Molex to 6pin PCI-e adapter
It is worth remembering the following calculations:
The CPU connector and cable has 4 12v lines, the PCI-e connector has 3 12v lines, the 6pin connector on the power supply can have 2 to 3 12v lines. We try not to supply more than 5A to each line and a maximum of 6A.
Recommended calculations beyond which you should not go:
- For the CPU connector: 4*5A = 20A*12V = 240 watts – load on the connector.
- For PCI-e connector: 3*5A = 15A*12V = 180 watts – load on the connector.
- For a 6pin connector: 2*5A = 10A*12V = 120 watts – load on the connector.
- For Molex connector: 8A*12V = 96 watts – load on the connector.
Having a wattmeter, we can calculate the consumption of a video card, let’s say the video card consumes 120/130 watts from the outlet, subtract the unit efficiency of 15% from this figure, and we get 102/110 watts of actual video card consumption per connector. For clarity, this example shows that you cannot install two video cards via an adapter on one 8pin PCI-e connector! Or for a Molex connector, it is undesirable to connect more than one riser through an adapter.
How to choose the right board
The choice of mining board today is made by its color. This is the simplest way to distinguish risers, although this is what some manufacturers use for marketing purposes.
Let's consider each type separately.
Greens
The only representative of low-profile risers. It is considered the cheapest and worst option in mining. Green ones are distinguished by poor-quality soldering. Most often they cause equipment malfunctions. It has a 4 pin Floppy connector, which has been missing for farms for a long time.
Black
One of the most popular and sought after options among miners. Most often they are equipped with Fortune Semiconductor or Diodes stabilizers. Features a manual latch.
Blue
Almost a complete analogue of black. The only difference is that these models have stabilizers from another manufacturer, and there is also no latch.
Blue
The model is almost identical to the blue and cyan ones, but with different stabilizers and different wiring (does not provide any advantage, since the differences are not used). Manual latch.
All models with USB 3.0 are full-profile and also have a crossover. Some models may have additional power supply. In order not to get confused by colors, which is often manipulated by manufacturers, it is worth familiarizing yourself with the main models of devices. In this case, you can understand which riser is in front of you by the markings.
| Version | Power interface | Power indicator |
| 006 | 4 pin (Molex) | Absent |
| 006C | 6 pin (Video) | Absent |
| 007S | 15 pin (SATA) | Absent |
| 008S | Has all three types | Present |
From this we can draw a simple conclusion - 008S is considered the best choice for mining, as it is the most universal. Although any device will perform its task, the only difference is in convenience, safety and technical organization. Any versions (003, 005 and others) are a typical marketing ploy designed to confuse miners.
Connection and setup
Now let's move on to the practical part and look at how to connect risers. It’s worth clarifying right away that if you use server power supplies, you need to take models with 6 Pin connectors. This eliminates the need for additional soldering and the use of special adapters.
Before direct connection, you need to check the equipment. This applies to checking power supply, contacts, etc. It is advisable to use an “unnecessary” video card for this. An important step is power distribution. The choice of power supply most often depends on the number of cards in the farm. That is, the choice will be between one server or two regular power supplies. Connect risers depending on the connectors. If Molex is used, then 2 video cards are usually connected to one power supply. In the case of not very “gluttonous” models, you can additionally connect one riser via a SATA connector.
In the case of a server power supply, it would be best to install an additional power supply (approximately 350 W) to provide power to the motherboard, hard drive, etc. Only connect video cards to the server power supply via 12-volt wires. The riser is connected via 6 Pin.
After organizing the power supply, just plug the video card into the riser. The second end of the USB cable is inserted into the PCI-E connector on the motherboard. After this, turn on the rig, the motherboard should itself detect all connected devices in the mining rig. It is important to pay attention to the following settings in the BIOS that will help improve performance:
- Disable USB 3.0 ports. and sound.
- Set PCI-E speed to Gen1 instead of automatic mode.
- CPU cooler speed – auto.
- Disable HDD SMART
The main question remains the relevance of the stabilizer on the riser. The converter turns 5v to 3.3v on the device itself. On the one hand, this simplifies the connection, on the other hand, it creates an additional link in the chain, which can be a disadvantage. In this case, when the stabilizer fails, not 3.3, but already 5v may go to the video card. Some miners use the upper voltage level and supply 12v to the stabilizers. However, when converting 12v to 3.3v, the stabilizer will work at its peak capabilities, which most often leads to its rapid failure. As a result, it may melt or damage the equipment.
What are Razers for mining and where to buy them
Today I will tell you about raisers for mining, as well as where to buy them.
First the theory:
The motherboard cannot accommodate many video cards for mining. Often, the motherboard has only 2 slots for inserting video cards. Yes, there are Chinese motherboards that have 8 slots for insertion, but here another problem arises - the cards will heat up the motherboard very much and this is very bad.
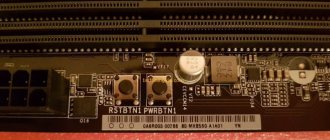
Therefore, usually there are 8 PCI-E connectors on the motherboard, where you can insert special connectors, and from these connectors a wire goes to the video cards themselves.
There are 3 types of risers:
Razer with 6-pin connector:
Razer with Molex connector:
Razer with Sata connector:
They all differ from each other precisely in the connectors.
6-pin and Molex connectors
And here is a raiser with a Sata connector:
Currently, there are already hybrid raisers that have 6-pin, Sata and Molex connectors:
These raisers are convenient because you can insert any of the power wires there.
So what is the difference between all these connectors?!
The fact is that the power supply comes with wires with 3 types of connectors: Molex, Sata and 6-pin. And depending on what kind of raiser you have, that’s where you insert that wire.
The problem is that often the power supply does not have enough power wires of one type. Let’s say there are 6 wires with a 6-pin connector on the power supply, but all these wires are busy because they already power the video cards. And you have to look for other types of wires. Therefore, it is very important to have a raiser with different types of connectors.
I recommend a raiser with Molex connectors. This is explained simply:
All video cards have power connectors of either 6-Pin or 8-pin, and sometimes more. And therefore there are few free power cables with 6-pin.
If you buy, then take the Molex raiser. I do not recommend a raiser with Sata connectors, because they often burn out.
The general view of the raiser is as follows:
Here you can see the raiser itself, a USB cable, an adapter from 6-pin to Sata and a connector for insertion into PCI-E.
Why do you need a 6-pin to Sata adapter?! When there are no free wires with a 6-pin connector, then install an adapter with the ability to insert a wire from Sata.
And wires with Sata connectors are almost always free. But you need to try not to install adapters on Sata, because they often burn out.
Next, we insert our video card into the raiser, using a USB cable connecting the raiser to the PCI-E connector on the motherboard. Well, then we connect the power wires coming from the power supply to the video card.
Attention: It is very important to insert the PCI-E connector correctly. If you place it incorrectly, the card may burn out.
The long channel on the connector must match the long channel on the PCI-E slot:
If you turn the connector 180 degrees and insert it, the card will receive 4 times more voltage, and it may simply burn out.
Only after inserting all the raisers, connecting power to the raisers and cards, can you turn on the farm itself.
Where to buy a raiser:
You can buy a raiser in St. Petersburg or Moscow. But usually they are more expensive here and also terrible. About every third raiser is bad. Therefore, I recommend buying a raiser on Ali. They usually last a month, but they are high quality, and if you have a lot of them, you can simply sell them.
Here is a raiser with a 6-pin connector -
Here is a raiser with a Molex connector –
Here is a raiser with a Sata connector –
Well, at the end I made a video so that everything is clear to you:
FAQ
Let's briefly look at the answers to the most common questions:
- Are there any real benefits from stabilizers in mining? – According to numerous miners and technical specialists, these are marketing ploys with dubious benefits.
- How many loopback risers can be connected without additional risks? - Maximum two.
- Is it necessary to check devices before starting work? – Yes, 100%. This will save you from unnecessary losses in case of malfunctions.
- Are the main and additional 12v power lines connected in the video card? - No.
- Can risers be placed on a metal surface? – No, over time the substrate may become deformed, which will lead to a short circuit.
- Will a USB 2.0 cable work? – No, it is not used in mining, it does not have enough cores to power the card.
- Which connector is preferable? – 4 pin (Molex).