Initial data
Downloaded and installed the FreePBX Distro assembly (SNG7-PBX-64bit-1904), release date May 2020.
It includes: FreePBX 14.0.11, CentOS 7.6, Asterisk 13/16, PHP 5.6.40, Python 2.7
As an example: local IP PBX 192.168.0.87, + external domain pbx.a-ctroy.ru and external address 37.113.134.80
Phone number 79320111675, also known as trunk for calls.
For ease of work, I use SHH access: to the SecureCRT console, to WinSCP files + NotePad++ editor.
Setting up external access to the PBX
Next, we need to make it possible to access our web server from the Internet.
To do this, you need to allow ports 80, 5038 (if you are installing the module on a hosting outside the local network), 443 (SSL access). Also configure NAT (forwarding) for these ports. Each router has its own settings, in my case I have MikroTik RB2011UiAS.
Open IP => Firewall => Address List. Let's create a list of IPs that have external access to our ports.
Let's add Bitrix IP addresses to it:
/ip firewall address-list add address=bitrix24.ru list=tel add address=bitrix24.net list=tel add address=bitrix24.com list=tel
And most importantly our/your Bitrix24:
add address=a-ctroy.bitrix24.ru list=tel
In version 6.26. You can specify a domain name as an IP.
Open IP => Firewall => Filter Rules. We create access and denial rules for ports 80,5038,443.
Allow access to port 80. Let's create a rule:
General.Chain tab: forwardProtocol: 6(TCP)Dst. Port: 80In. Interface: < and Action.Action: accept
We move the rule to the very top of the list so that there is maximum priority.
We create a new ban rule for port 80.
General.Chain tab: forwardProtocol: 6(TCP)Dst. Port: 80In. Interface: <
We put the rule of prohibition under the rule of permission.
The logic is this: we allow access to those on the list. Then we drop everyone who is not on the list.
We will do the same (independently) for ports 443 and 5038.
We create forwarding rules for ports 80, 5038, 443.
Open IP => Firewall => NAT. General.Chain tab: dsnatProtocol: 6(TCP)Dst. Port: 80In. Interface: < 192.168.0.87 (IP of our PBX)To Port: 80
We will do the same (independently) for ports 443 and 5038.
That's it, we have set up access to the PBX web interface from outside, for a limited number of people.
Main menu of the service: overview
Menu sections are located in the left column of the screen. I'll go through them briefly.
Live feed – portal events page
Contains several subsections:
- “Message” – a tab where you can write messages and view SMS from other colleagues; sending is possible to all employees or groups, departments, and email users.
- “Task” – a tab designed for creating tasks. Click "Submit" and it will automatically appear in the list of Live Feed notifications. In the upper right corner, check the box to assign the “Important task” status.
- “Event” – a tab where events are created, required information, settings and employees are indicated for whom this message will be displayed in the Live Feed.
- “Survey” – a tab for creating surveys that will appear in the feed (for all employees or groups, departments you select, etc.).
- “More” – here are additional tabs for sending files, thanks, important messages to the Live Feed.
Access to the web interface using a domain name via SSL (Optional item)
Let's give the domain name of our PBX; to do this, open the FreePBX web face, then Admin => System Admin => Hostname. Let's call it pbx.a-ctroy.ru
Click Update Hostname.
Now we need to configure a DNS server that will make friends between the pbx.a-ctroy.ru domain and our external IP 37.113.134.80. The domain a-ctroy.ru itself is located on the hosting SWEB.RU, where I will configure the DNS. I’ll go to the DNS item, then Subdomain Records, select the domain a-ctroy.ru. At the very bottom I will create an A record.
Immediately after this, the web interface should open at pbx.a-ctroy.ru. If it doesn’t open, your IP is not in the access list, or you are opening from the local network in which the IP PBX is currently located (read “ip loopback mikrotk” for general development).
Next, we get SSL, open the FreePBX web face, then Admin => Certificate Management => New Certificate => Generate Let's Encrypt Certificate.
In the window that appears, fill in the fields Email, Country and Region. Click Generate certificate. Before this action, I recommend adding the IP addresses of Let's Encrypt servers to the list of allowed ones on MiroTike (IP => Firewall => Address List.) I will add them through the console. Adding domains is possible on firmware above 6.36.
/ip firewall address-list add address=outbound1.letsencrypt.org list=tel add address=outbound2.letsencrypt.org list=tel add address=mirror1.freepbx.org list=tel add address=mirror2.freepbx.org list=tel
Let's return to Certificate Management, delete the default certificate (type Self Signet - self-signed), we see a new certificate from Let's Encrypt. In the Default field, put a checkmark next to it.
Then go to Admin => System Admin => HTTPS Setup => Settings
In the Certificate Manager field, take our certificate and click Install.
At this point, we specified the certificate for the Apache web server and completed the installation of SSL access.
Communications
Chats, Notifications, Live Feed, Calendar, and Daily Reports are responsible for communications in Bitrix24.
Chats organize communications between employees and completely replace the functionality of the corporate messenger Slack. Chats are divided into 2 types: closed and open. Closed chats are used to discuss issues with a limited number of people. You can only get into a private chat by invitation; it is not visible in the general list of chats. An open chat, on the contrary, is visible to everyone and any employee can join it.
Bitrix24 has telephony built in by default, so if employees don’t have enough communication in Chat, you can set up internal corporate communications.
The notification panel is a standard Bitrix24 tool that helps you not miss important things. The notification panel displays your interactions with colleagues and clients in personal and group chats, and also shows who you've interacted with recently.
A live feed is a feed of your company’s events; all current events are displayed here, which are visible to all company employees registered on the portal. The live feed is built on approximately the same principle as feeds on social networks, such as VKontakte or Facebook. Events, messages, ideas, votes, etc. are displayed here.
The calendar functions as a planner. You can plan both your working day and general events. You can schedule a meeting or meeting. Between Meetings and Meetings, several functional differences can be immediately identified.
- In meetings, you can choose not only participants, but also a secretary (the person who will keep minutes of the meeting)
- Meeting minutes are a functionality that allows you to record all the important points discussed at the meeting.
- Expanded functionality of the “Meeting Description” field. You can format the text to your liking and style.
- And the most significant difference is the “Agenda” section. Here the issues being discussed are identified and responsible persons are assigned for each of them. During the meeting, each participant knows the general program and the topic on which he will need to speak.
Work reports help to establish communication between the manager and the employee. Employees send a report to the manager about the work done during the day. The manager monitors current work, plans future tasks and gives feedback.
Let's create an AMI user in FreePBX
Open the file /etc/asterisk/manager.conf
Add a section
[callme] ; AMI username secret = 123456789 ; Password for connection, make it more complex deny = 0.0.0.0/0.0.0.0 ; We prohibit connection from any address permit = 127.0.0.1/255.255.255.0 ; And gradually we allow the necessary permission = 192.168.0.87/255.255.255.0 ; So we allow a specific hostpermit = 192.168.0.0/255.255.255.0; And this is how you can resolve the subnetread = system,call,log,verbose,agent,user,config,dtmf,reporting,cdr,dialplanwrite = system,call,agent,log,verbose,user,config,command,reporting,originate
Setting up webhooks in Bitrix24
Let's go to Applications => Webhooks.
Let's add an Incoming webhook.
We call it, for example CallMeIn, and give it the rights:
- CRM (crm)
- Telephony
- Telephony (making calls) (call)
- Disk
- Company structure (department)
- Chat and notifications (im)
- Creation and management of Chatbots (imbot)
- Tasks
- Tasks (extended rights) (tasks_extended)
- Users
- System instant messages (without access to the user's service channel) (pull)
- Service channel for instant messages of the system (subscription to information about updates of all system elements available to the user) (pull_channel)
- Lists
After saving, we get the REST url https://your-name.bitrix24.ru/rest/1/1s777vji3m123dhv/profile/
, save for yourself in a notepad https://your-name.bitrix24.ru/rest/1/1s777vji3m123dhv/
Let's add an Outgoing webhook.
Handler address: https://pbx.a-ctroy.ru/callme/CallMeOut.php (in your case it may simply be https://ip-external/callme/CallMeOut.php) Name: CallMeOut Event type: Call initiation via application (ONEXTERNALCALLSTART)
We save and receive the authorization code: dtng3732h7777777777vmk524a4lvhj7
How will Ethereum be able to work using sharding?
During his keynote speech at an event held at the Singapore University of Social Sciences School of Business, Ethereum founder Vitalik Buterin tried to explain in simple terms the concept of using shards in the Ethereum blockchain. In his report entitled "The Road Ahead" he stated:
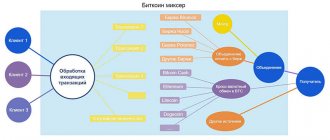
“Imagine Ethereum being divided into thousands of islands. Each of them will be able to perform its function. Each of the islands will receive unique features, and everyone who belongs to a particular island (that is, has an account on it) will be able to interact with each other and freely use all its functions. If they want to communicate with other islands, they will have to use a certain protocol."
Currently on the Ethereum network, as well as other blockchains, each node is a storage location for the global state of the network. The list of stored data includes account balances, contract codes and all additional relevant information. In addition, all nodes participate in processing all transactions. Although this allows for a very high level of security, this approach severely limits the ability to scale the network because the blockchain contained within a specific project is essentially just a single network node.
In other words, the speed of a blockchain is determined by how fast one node is, since all nodes must perform the same transactions one after another.
To solve this problem, the creators of the Ethereum network plan to implement a new version of it using “shards”. As part of the new project, for each node participating in the system, processing the entire blockchain history will no longer be a mandatory action to add a new transaction to the ledger. Instead, each node will only process data that is relevant to a specific shard.
Both quadratic and exponential shards will be applied. The quadratic approach involves splitting the register in such a way that only one “shard” remains in the main chain. However, with exponential sharding technology, shards can be placed inside other shards.
While developers have yet to determine what criteria they will use to split global states into shards, there is a description of how it should work:
“For example, a sharding scheme within Ethereum might involve placing all addresses starting with 0x00 in one shard, and addresses starting with 0x01 in another, etc. In its simplest form, each “shard” would have its own transaction history, and the effect transactions in a particular shard k will be limited by the state of shard k.”
Using this example, it is worth noting that each node processing associated with wallets in a specific shard should only affect the information residing in that specific shard. This will increase the speed, as well as the number of transactions that each node can process.
Additionally, the new design will include the use of smart contracts on the main chain. Smart contracts will be responsible for achieving consensus between the shards and the main chain. It will be called the “sharding dispatch contract.” The new project will also feature different types of network participants:
“Multiple shards will be processed separately by different subsets of participants, including notaries, originators, miners and validators.”
In addition to new types of network participants, the new design will also create different types of nodes. A super-full node will store information about the comparison of all the “shards” with each other, as well as the main chain, ensuring that full consensus is achieved.
The top-level node will process all the main blocks of the chain, acting as a “light client” to access all “shards”. Single shard nodes will be a top-level node type that completely loads and validates every data mapping on a specific shard. Finally, the light node will be responsible for downloading and validating the block headers of the main blockchains and will only have access to the data it needs for a specific transaction.
While random cross-linking would negate the entire concept, the developers intend to provide it in cases where it is needed. Using a so-called receipt system, the shards will be able to verify the information exchanged.
It is important to note that sharding technology can be implemented in the Ethereum network only after the transition to the PoS algorithm. After its implementation, you can expect a significant improvement in network efficiency.
Setting up the Asterisk integration module - Bitrix24
Open /var/www/html/callme/config.php
Explanations:
tech – the technology by which telephony works (SIP, IAX, DAHDI, PJSIP, etc.)
authToken — Bitrix24 authorization token, outgoing webhook authorization code
bitrixApiUrl — URL of the incoming webhook, without profile/ (There must be a “/” symbol at the end of the URL)
extentions — list of city numbers connected to the PBX. The number must be indicated strictly in the format in which it is specified in the trunk parameters (IMPORTANT! Numbers are indicated in the format '123456789','1234567890' - there are single quotes on the sides of the number.
context – context for making outgoing calls (by default this is from-internal)
Making changes to /var/www/html/callme/CallMeIn.php
94, line. Change /^http.+$/ to /mp3/
You get: if(preg_match('/mp3/',$event->getValue())) $globalsObj->FullFnameUrls[$callUniqueid] = $event->getValue();
To log the operation of the module, we will create a folder and give permissions.
mkdir /var/www/html/callme/logsmkdir /var/www/html/callme/records mkdir /var/www/html/callme/monitor/ mkdir /var/www/html/callme/records/wav mkdir /var/ www/html/callme/records/mp3 touch /var/www/html/callme/logs/CallMe.logchown asterisk:asterisk /var/www/html/callme -Rchmod +x /var/www/html/callme/CallMeIn. phpchmod +x /var/www/html/callme/CallMeOut.php
Let's create call routes. Edit /etc/asterisk/extensions_override_freepbx.conf
globals { WAV=/var/www/html/callme/records/wav; //Temporary directory with WAV MP3=/var/www/html/callme/records/mp3; //Where to upload mp3 files URLRECORDS=https://pbx.a-ctroy.ru/records/mp3; RECORDING=0; // Recording, 1 - enabled.};[macro-hangupcall] include => macro-hangupcall-custom exten => s,1,Set(CDR(userfield)=${CHANNEL(hangupsource)}) exten => s, n,Set(FullFname=https://pbx.a-ctroy.ru/callme/monitor/${YEAR}/${MONTH}/${DAY}/${CALLFILENAME}.mp3) exten => s,n ,Set(CallStart=${UNIQUEID}) exten => s,n,Set(CallStop=${STRFTIME(epoch,,%s)}) exten => s,n,Set(CallMeDURATION=${MATH(${ CallStop}-${CallStart},int)}) exten => s,n,ExecIF(${ISNULL(${CallMeDISPOSITION})}?Set(CallMeDISPOSITION=${CDR(disposition)}):NoOP(=== CallMeDISPOSITION already was set ===)) exten => s,n,System(/usr/bin/lame -h -b 192 /var/spool/asterisk/monitor/${YEAR}/${MONTH}/${ DAY}/${CALLFILENAME}.${MON_FMT} /var/spool/asterisk/monitor/${YEAR}/${MONTH}/${DAY}/${CALLFILENAME}.mp3) exten => s,n, System(/bin/rm -rf /var/spool/asterisk/monitor/${YEAR}/${MONTH}/${DAY}/${CALLFILENAME}.${MON_FMT}) exten => s,n,Set (CDR(recordingfile)=${CALLFILENAME}.mp3) exten => s,n,Hangup exten => s,n,MacroExit() macro recording(calling,called) { if (“${RECORDING}” = “1 "){ Set(fname=${UNIQUEID}-${STRFTIME(${EPOCH},,%Y-%m-%d-%H_%M)}-${calling}-${called}); Set(datedir=${STRFTIME(${EPOCH},,%Y/%m/%d)}); System(mkdir -p ${MP3}/${datedir}); System(mkdir -p ${WAV}/${datedir}); Set(monopt=nice -n 19 /usr/bin/lame -b 32 —silent “${WAV}/${datedir}/${fname}.wav” “${MP3}/${datedir}/${ fname}.mp3" && rm -f "${WAV}/${fname}.wav" && chmod o+r "${MP3}/${datedir}/${fname}.mp3"); Set(FullFname=${URLRECORDS}/${datedir}/${fname}.mp3); Set(CDR(filename)=${fname}.mp3); Set(CDR(recordingfile)=${fname}.wav); Set(CDR(realdst)=${called}); MixMonitor(${WAV}/${datedir}/${fname}.wav,b,${monopt}); };};context incoming {793230111000=> { //our trunk number &recording(${CALLERID(number)},${EXTEN}); Answer(); ExecIF(${CallMeCallerIDName}?Set(CALLERID(name)=${CallMeCallerIDName}):NoOp()); // set the CallerID if we found it out from Bitrix24 Set(CallStart=${STRFTIME(epoch,,%s)}); Queue(Q1,tT); Set(CallMeDISPOSITION=${CDR(disposition)}); hangup(); }h => { Set(CDR_PROP(disable)=true); Set(CallStop=${STRFTIME(epoch,,%s)}); Set(CallMeDURATION=${MATH(${CallStop}-${CallStart},int)}); ExecIF(${ISNULL(${CallMeDISPOSITION})}?Set(CallMeDISPOSITION=${CDR(disposition)}):NoOP(=== CallMeDISPOSITION already was set ===)); System(curl -s https://pbx.a-ctroy.ru/callme/CallMeOut.php —data action=sendcall2b24 —data call_id=${CallMeCALL_ID} —data-urlencode FullFname=${FullFname} —data CallIntNum=$ {CallIntNum} —data CallDuration=${CallMeDURATION} —data-urlencode CallDisposition=${CallMeDISPOSITION}); }}context default {_X. => { Hangup(); }};context dial_out {_. => { &recording(${CALLERID(number)},${EXTEN}); Set(__CallIntNum=${CALLERID(num)}) Set(CallStart=${STRFTIME(epoch,,%s)}); Dial(SIP/${EXTEN}@toOurAster,,t); hangup(); }h => { Set(CDR_PROP(disable)=true); Set(CallStop=${STRFTIME(epoch,,%s)}); Set(CallMeDURATION=${MATH(${CallStop}-${CallStart},int)}); if(${ISNULL(${CallMeDISPOSITION})}) { Set(CallMeDISPOSITION=${CDR(disposition)}); }System(curl -s https://pbx.a-ctroy.ru/callme/CallMeOut.php —data action=sendcall2b24 —data call_id=${CallMeCALL_ID} —data-urlencode FullFname=${FullFname} —data CallIntNum= ${CallIntNum} —data CallDuration=${CallMeDURATION} —data-urlencode CallDisposition=${CallMeDISPOSITION});}};
Robots and triggers - what's the difference?
Robots and triggers in Bitrix24
is a simple and effective tool for sales automation.
Project+
tariff plan and higher (robots in transactions are available only from the “
Team
” tariff plan).
The main difference between robots and triggers:
- robots launch some process
(creating a letter, notification, task or sending an SMS message) when a lead or deal reaches a certain stage of processing; - triggers move a lead or deal to the desired stage
if some event occurs (an incoming letter, a form on the website is filled out, etc.).
So, when an entity goes into a state for which the robot is configured, it will fire and perform some actions instead of the manager. For example, you can set up a robot that will send a letter to the client if the lead is accepted (has moved to the “Appointed Responsible” stage).
A trigger can be launched by some action on the client’s side when the entity is at a certain stage. For example, if a lead fills out a form on the website, then, bypassing other stages, he will immediately go to the “Quality Lead” stage.
Let's configure Supervisor
In order for our module to always monitor incoming calls and interact with Bitrix24.
Let's create the supervisord folder and the /etc/supervisord/supervisord.conf file in it:
[unix_http_server]file=/tmp/supervisor.sock ; the path to the socket filechmod=0777 ; socket file mode (default 0700)[inet_http_server] ; inet (TCP) server disabled by defaultport=*:9001 ; ip_address:port specifier, *:port for all ifacechmod=0777chown=root:supervisor[supervisord]logfile=/tmp/supervisord.log ; main log file; default $CWD/supervisord.loglogfile_maxbytes=50MB ; max main logfile bytes b4 rotation; default 50MBlogfile_backups=10 ; # of main logfile backups; 0 means none, default 10loglevel=debug ; log level; default info; others: debug,warn,tracepidfile=/tmp/supervisord.pid ; supervisord pidfile; default supervisord.pidnodaemon=true ; start in foreground if true; default falseminfds=1024 ; min. avail startup file descriptors; default 1024minprocs=200 ; min. avail process descriptors;default 200chmod=0777chown=root:supervisor[rpcinterface:supervisor]supervisor.rpcinterface_factory = supervisor.rpcinterface:make_main_rpcinterface[supervisorctl]serverurl=unix:///tmp/supervisor.sock ; use a unix:// URL for a unix socketmod=0777chown=root:supervisor[program:callme]command=/usr/bin/php CallMeIn.phpdirectory=/var/www/html/callmeautostart=trueautorestart=truestartretries=5stderr_logfile=/ var/www/html/callme/logs/daemon.logstdout_logfile=/var/www/html/callme/logs/daemon.log
Let's create a service file that will allow Supervisor to start immediately in the background when the PC starts /etc/systemd/system/supervisord.service:
[Unit]Description=Supervisor daemonDocumentation=https://supervisord.orgAfter=network.target[Service]ExecStart=/usr/bin/supervisord -n -c /etc/supervisord/supervisord.confExecStop=/usr/bin/supervisorctl $ OPTIONS shutdownExecReload=/usr/bin/supervisorctl $OPTIONS reloadKillMode=processRestart=on-failureRestartSec=42s[Install]WantedBy=multi-user.targetAlias=supervisord.service
Let's start the service systemctl start supervisord.service
And let's check in 2 ways:
By executing the command
ps aux | grep super
And checking the operation of the web console https://192.168.0.87:9001/
Nuances
1) When you click on a client’s phone in Bitrix24, the PBX will first call your internal number, then dial the client’s number.
Open https://YourName.bitrix24.ru/company/ or Employees => Employees
Next, each employee must have an internal telephone number that corresponds to the internal number on the PBX.
2) It is necessary that the PBX has a rule for outgoing calls to the number that Bitrix24 is going to call.
3) When there is an incoming call, in order for a new lead to be created or a card to pop up, it is necessary that the employee is online and his extension number is registered on the PBX.
Additional features of the CRM card
Add cases and comments to the event feed (hereinafter referred to as the timeline) of the deal and the lead. Plan work with a client completely from the CRM card - you can leave a comment, schedule a task, etc.:
The process of creating a comment is very simple. The comment entry window has a familiar visual editor. You can format the text, add a mention of another employee and attach additional materials (file, video).
An important comment can be pinned to the top of the timeline using the pin button.
This is a cool replacement for paper sticky notes on your desktop. Now all the important notes on each transaction are just a few clicks away.
How to delete a comment from a CRM card?
If a previously created comment is no longer relevant: edit, unpin, or delete it. Simply call up an additional menu by clicking on the arrow.